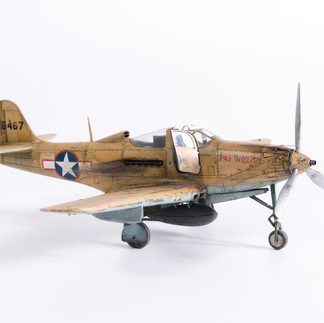
With the painting and chipping process complete, I’ve now reached the weathering and final assembly stage of the Airacobra. In addition, I still had to finish assembling other components, such as the propeller, external fuel tank, and a few other parts.

Sub-assemblies
I began by completing all the remaining components. Each piece underwent substantial weathering and wear to match the overall look of the model. Below, you’ll find a detailed description of the build process for each component.
Propeller
I carefully removed all the required parts from the sprue and cleaned up the attachment points. After that, I wiped down each piece with IPA (isopropyl alcohol) to prepare them for painting. I started by airbrushing a coat of Mr. Surfacer 1000 in grey, and once it dried, I followed up with Mr. Color GX 1 black. In the next step, I applied AK 481 Polished Aluminium and sealed everything with a layer of gloss varnish (Mr. Color 46) for protection.
Hub
I'll skip describing the painting and chipping process since it's the same as for the fuselage and jump straight to the weathering stage. I began by creating the first layer of dirt using a Black wash and PLW Medium Tan, applied with the dot technique. Then, using the sponge chipping method along with AK Aluminium and Olive Drab paints, I added distinctive abrasions to the paint layer. After that, I applied another layer of dirt, this time using Shafts & Bearings Grease, which I flicked onto the surface of the hub part for a more realistic effect.
Blades
I started by airbrushing two layers of AK chipping fluid, and once it dried, I applied a coat of Mr. Color Silver. Shortly after, I carefully chipped the surface of the propeller blades, focusing on the edges for a realistic worn effect. Once this was done, I sealed the work with a layer of gloss varnish and applied the necessary decals. Everything was protected with a coat of Hataka satin varnish.
For weathering, I used the Rainmark Effects product and blended it in. After that, I flicked on Shafts & Bearings Grease and blended it as well. Finally, the backs of the propeller blades were treated with Industrial Dirt oil wash to complete the look.
Propeller Assembly
The way the propeller blades attach to the hub leaves much to be desired. Each blade is designed as a separate part, and they must be inserted into their respective sockets with an angle of attack set to 37 degrees, as clearly stated in the instruction manual. The issue is that the blades can be inserted without any clear restrictions or guides, making it difficult to ensure proper positioning.
The last time I encountered such an approach was with Airfix's Ju-87 Stuka kit, but in that case, an auxiliary mold was provided. Each blade was first placed on the mold to achieve the correct angle before being glued to the hub. Unfortunately, with the Airacobra kit, I had no such assistance and had to eyeball it.
I decided to use Tamiya epoxy cement for attaching the blades. The first one was relatively easy, but positioning the subsequent blades was more challenging since they needed to be aligned with the same angle as the first. In the end, I managed to get them attached. It’s not perfect, but it’s close enough to look convincing.
External Fuel Tank
I began by gluing both halves of the fuel tank together using Tamiya Extra Thin Cement. To add a fuel cap imitation, I used a hole punch of the correct diameter to create the demarcation between the cap and the tank. I then deepened the indentation with a modeling scriber and cleaned it up using more Tamiya Extra Thin Cement.
Next, I applied a coat of Mr. Finishing Surfacer 1000 in grey as a primer. Once dry, I airbrushed a mix of Neutral Grey and Flat White to create the base color for the chipping effect. After applying two thin layers of AK chipping fluid, I airbrushed the final coat of Neutral Grey. As soon as it was touch dry, I performed the chipping, focusing on the front and bottom areas of the tank. Once I was happy with the results, I sealed the work with a layer of gloss varnish.
For weathering, I began with an Industrial Dirt wash, applying it all over the tank and removing the excess with cotton pads. To simulate dirt left by the ground crew handling the tank, I used the dot technique with Black and PLW Medium Tan washes. I also added additional splatter to the bottom of the tank using the Black wash. After everything dried, I applied another layer of dirt around the fuel caps and cantilever sockets, using Black and Neutral washes on the still-wet surface.
Once the washes were dry, I sealed the weathering with a layer of matte varnish. Then, using weathering pencils in appropriate shades, I added fine scratches for extra detail. To finish, I airbrushed a final coat of satin varnish to protect the work.
Exhausts
I decided to use resin counterparts because they offer much better quality. After removing them from the casting blocks and cleaning them up, I primed the parts with Mr. Finishing Surfacer in black. Next, I applied AK 476 Steel color.
To achieve a heavily worn look on the exhausts, I started with a generous application of Track wash. On top of that, I added pigments in three different colors: Dark Rust, Soot Black, and finally Smoke. To enhance adhesion and restore some shine, I coated the exhausts with AK Exhaust wash and added Shafts & Bearings Grease around the openings for extra detail. To finish, I applied a metallic shine to the openings using a weathering pencil.
Weathering
For the weathering, I aimed to depict a heavy-duty machine showing significant signs of wear and tear. The represented airframe had been stationed in the Pacific archipelago for several months, so I opted for dry and dusty surfaces to reflect the environmental conditions in which this aircraft operated.
I started by applying filters to further differentiate some of the panels, mixing Abteilung oil paints with Odourless Thinner to create my own blends. For the bottom surfaces, I used Cream Brown and Light Grey, while the panels on the top and sides of the fuselage were treated with Ocher, Light Flesh Tone, and Sunny Flesh Tone.
Next, I created the first layer of dirt by flicking washes onto the surface using a toothpick and a brush. I applied Neutral and Black colors to the bottom surfaces and black to the top. After a couple of minutes, I removed excess wash from unwanted areas and blended the rest with a dry, clean brush.
In the following step, I concentrated on adding a second layer of dirt, focusing on the wing root area. I first dabbed the surface with Streaking Grime, letting it sit for a few minutes before blending it in. Afterward, I applied a Black wash on top and blended that as well. All of this work was sealed with a layer of satin acrylic varnish.
To add more variety to the final colors on the wing surfaces, I employed the dot painting technique commonly used in AFV modeling. I selected several colors: Smoke, Light Sand, Sepia, Sunny Flesh Tone, Light Flesh Tone, and Ocher. Once the small dots were applied to the surface, I blended them in using a clean brush lightly moistened with Odourless Thinner.
Another effect I like to showcase is the dirt that gets dragged from some panel lines to the rear of the panels, adding additional interest and a realistic touch to the finish. This effect is subtle but enhances the overall appearance. To achieve this, I used Starship Bay Sludge and Black oils. With a very small brush, I applied the color along the panel line just behind it. Then, I removed the excess and dragged it with a clean flat brush. If the effect was still too pronounced, I made a second pass with the brush. I applied the same technique to selected panels on the bottom of the aircraft, using Dusty Earth for that area. All was protected with a layer of gloss acrylic varnish.
Next, I enhanced the panel lines and rivets using washes from the PLW series. The top and side surfaces received the Africa Corps color, while the bottom got Dark Sea Blue. I used a Black wash for the wider gaps around the ailerons to emphasize the effect further.
I also added streaking effects, primarily in areas where dirt accumulates and is then dragged back, creating distinctive patterns. For this, I used a streaking brush with Cold Dirty Grey. Once all the work was done, I secured it with a layer of matte varnish. After it dried, I used weathering pencils to add small details and missing scratches. I then made minor painting corrections around the cockpit door frames, landing gear bays, and other areas. Following this, I applied a final transparent layer to restore some shine using a mix of matte and gloss Mr. Color varnishes.
Once dry, I added spills in specific areas, particularly on the bottom of the aircraft, using Streaking Grime, Streaking Grime for Winter Vehicles, and Black wash.
The last step in the weathering process was to add exhaust stains. I started by airbrushing a mix of Buff (XF-57) and White (XF-2) colors. Next, I added Brown (XF-10) followed by Black (X-18), applying very thin layers to avoid overdoing the effect. Once dry, I used Light Dust and Smoke pigments to enhance the look. I then added fresh staining around the slot for the exhaust stacks using Oil and Shafts & Bearings Grease products. In certain areas, I added another layer of pigments in Grey Forest color and painted fresh oil stains trailing from the exhaust stacks.
Final Assembly
I began with the landing gear, starting with the nose strut and all the necessary parts. For attaching the nose gear leg, I used epoxy glue, which allowed me enough time to check the fit and adjust the angles as needed. The rest of the components were secured with Tamiya Cement. The wheel was already attached, so I added a small amount of CA glue to keep it in place.
Next, I moved on to the main struts and wheels. Again, I opted for epoxy glue to give myself ample time to position them correctly and make any necessary adjustments. To enhance the detail, I replicated the brake system lines using lead wires of various sizes from Plusmodel, along with Albion tubes for the clamps and brackets. All these elements were prepared, painted separately, and then glued to the struts and inside the landing gear bays. Finally, I attached the landing gear bay covers using CA glue.

In the next stage, I quickly attached the exhaust stacks using CA glue, which was a straightforward task. After that, I removed the masking tape from the canopy and cleaned it up. I then attached the recognition lights using Clearfix. The external fuel tank was secured by two cantilevers, which I first glued to the fuselage with CA glue. A few minutes later, I attached the fuel tank.
Due to the poor fit of the hub to the front of the model, I decided to glue it in a way that would make the fit more acceptable. I used Tamiya Cement for this, as it provided me with a little extra time to adjust its position.
Next, I addressed the navigation lights. I used pre-made elements that I first cut out and cleaned. Each light on the back was painted with a Liquid Chrome marker. Once dry, I attached the light imitations to the fuselage using Clearfix, followed by a small drop of CA glue to ensure they were securely affixed to the surface.
At that point, I decided the model needed a bit more luster, but only in specific areas. To achieve this, I airbrushed a thin layer of a mix of gloss and matte varnishes onto the model.
Last Weathering Touches
I started by adding mostly dried dirt splashes using a technique that involved sprinkling the product onto the surface with a brush and a toothpick. For the first pass, I applied Earth Effects, followed by Landing Gear Dust Effect in the subsequent layer.
Next, I focused on dusting specific surfaces, particularly the wing root area, gondolas, external fuel tank, and parts of the landing gear covers. I used Airfield Dust and Light Dust pigments, applying them dry. Additionally, I added another layer of pigments mixed with Odourless Thinner to the wing root area and the walkways. Using Smoke pigment, I added soot and staining around the openings of the machine guns and cannons.
To enhance the staining around the front part of the aircraft, I applied Shafts & Bearings Grease product just behind the propeller hub. After a few minutes, I blended it in and dragged it back, creating specific patterns on the fuselage.
Finally, I simulated fresh stains, such as fuel around the fuel caps on the wings and oil around the exhaust stacks and propeller. For this, I utilized selected products from AK to achieve a realistic effect.
Small Details
In the final stage, I attached all the small details, including the antenna, main 37mm cannon and gondola cannon barrels, doors, and the pitot tube. For some of these tiny components, I used scratch-built counterparts.
For the main cannon barrel, I selected a tube of the appropriate diameter and length, which I primed in black. It was then painted with Mr. Metal Color Brass, polished with a cotton bud, and finally secured to the model using CA glue.
The pitot tube was made using Albion tubes of the correct diameters. I painted the rear portion with camouflage color and the front with Mr. Metal Color Chrome Silver. After polishing the front part, the completed pitot tube was attached to the model with CA glue.

Recap
It was a relatively small and quick build, but I learned a ton! From the very beginning, I intended for it to serve as a test-bed to experiment with a few techniques and take a bolder approach to painting and weathering. I am extremely pleased with how the painting turned out. The multi-level chipping technique, combined with the proper use of sanding sponges, yields incredibly realistic results and showcases a great range of wear and tear. I will definitely refine these techniques in future projects.
In terms of weathering, I think I may have gone a bit too far, particularly with the exhaust stains, but it mostly reflects the environmental conditions this aircraft operated in. I’m also glad I did some scratch building, as I’m getting better at it. I took an extra step by simulating recognition lights with lenses instead of relying on the provided decals, which I’m quite proud of.
Overall, I thoroughly enjoyed this build and can easily recommend this model to any modeler, including beginners. It’s easy to assemble, has a small number of parts, and fits together well.
Some of you may have noticed that I’m already in progress with the Pfalz D.IIIa build. This is the first time I’ve tackled an aircraft from the Great War, and I can’t wait to see how it turns out! In the meantime, I've included couple of photos of the finished model below. For the full gallery please follow to the garage page of the aircraft. I hope you like it! Feel free to check it out and leave a comment. Thanks!


Comentários