Next step after finishing preparation work for after market sets (described in previous blog entry) it was time take care of the cockpit which required assembly of the front wheel well, as well as the nose gun bay which is fitted just in front of the cockpit itself.
In case of the cockpit I decided to leave all the small parts (especially PE levers) and add later as to not damage them when handling the model in next stages of the build.
For the gun bay I selected only the main parts for the assembly - rest of it will be done closer to the end of the build.

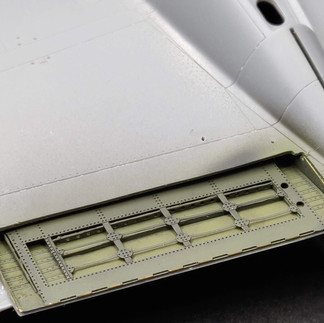
Photo Etched flaps housings were another components I took care of during this stage of the build - and that is the one I started with. First step was to cut out all relevant parts from the frame with sharp blade, then bend it properly for which I used RP Toolz Photoetch Bending Tool. Next it was time to glue the inner components which I did using CA glue - here I tried to be very careful as not apply to match of it as it would be visible later on. As you can see on the photos there is this top part which is to cover the inner framework though I left that open to have easier access for painting and weathering.

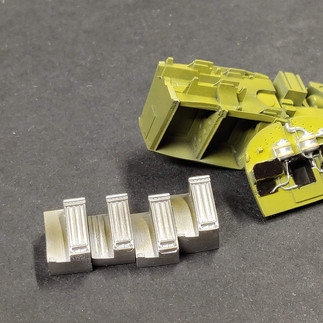
Before paining commenced I prepared some of the elements for future addition of colored PE by flat sanding required surfaces. I also added bare Photo Etched elements where required. Then I attached smaller parts to Tamiya Tape for ease of painting and cleaned all the parts with IPA. Now all prepared elements were primed with Mr. Finishing Surfacer 1500 Black, next I airbrushed black glossy undercoat on gun bay ammunition canisters and front wheel wells elements. After a while when paint was dry I applied Metallic Sliver (Mr. Color C8) to ammunition canisters and Polished Aluminum (AK Xtreme Metal) to wheel wells.
Nose Gun Bay

For the base color I selected Zinc Chromate Yellow (Tamiya XF-4 is close enough), though as I used a shading technique I started with the base color mixed with a bit of black and airbrushed it mainly in all the crevices and places which are rather in the shadow. Next I applied a base color focusing more on the protruding elements, then I added a bit of white and airbrushed it on the upper surfaces only - to bring it all together I applied very much diluted base color as the top layer. In the mean time I buffed ammunition canisters with Metal Polishing Powder (Steel Type) by Uschi to get more shiny surface.

Next step was to apply color to all the details - I brush painted it mainly using mig acrylics. Then I glued all parts together using Tamiya Epoxy cement - it is great glue as it gives time to properly set the parts and at the end creates a very strong bond. Layer of H101 clear gloss was applied next and as soon as it was dry decals were added and then again clear coat to secure them. Now I brush painted some scratches and it was time for weathering. I started with mig Starship Wash followed by mig Black Night from PLW line. Lastly I applied a layer of mat clear coat (H103).
Cockpit

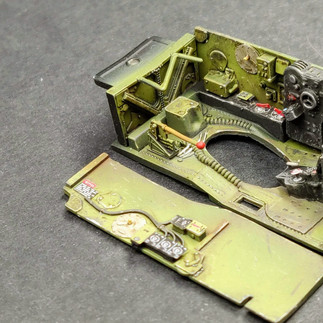
For the cockpit I applied the same technique as for the nose gun bay, though here the base color was H58 Interior Green. Additionally as the cockpit will be enclosed in the fuselage I applied downward shading where bottom of the side walls and the floor are darker than the top - this adds a bit more contrast at the end. Next I applied layer of H101 clear gloss. Then I brush painted consoles black using H2 Black and applied Photo Etched details. Another step was to make highlights to protruding elements - for that I used brush and lighter shade of the base color. Next step was to add scratches and paint chipping - that was done with brush as well. First I used dark color A. MIG-033 (Rubber & Tires) and then lighter shade of the base color. Last color used was A. MIG-0194 Matt Aluminum from Metal Acrylic Color line - this was applied especially on the edges of black consoles and then I used sponge chipping technique to apply scratches on the seat. This stage was finished with applying another cleat coat layer.

Next I used old good technique of dry brushing - i applied mainly on the cockpit floor to highlight some details. After that I used different washes from mig to add details in the crevices. On top of that H102 semi-gloss clear coat was sprayed as a protection layer before further weathering. When dry I added dirt and grim using Streaking Brushers and Oil Brushers from mig and then secured it with the mat clear coat (H103). Now last step of weathering commenced using Weathering Pencils from AK.
It was for the first time that I used seat-belts from HGW - those are textile seat belts made from real microfibre and in combination with included photo etched buckles they should look highly realistic and indeed they do, though I had some problems interspersing belts through the smaller of the buckles - the belts basically where to wide and to thick. In the end though I maned to do it and I am very happy with the result. Instrument Panel wise I used P-38 G Lightning Tamiya YAHU YMA4889 set - they have amazing quality, much better than Eduard Look line or Eduard PE.

Last thing to be done was to glue the floor back and side walls together - for that I used again Tamiya Epoxy cement which worked great. In the meantime I painted and weathered top surface for the radio compartment as well as sides of the cockpit - both located on the main fuselage part which will be attached over the cockpit.
Later on in the build process I will add missing PE levers and some pigments to further imitate dirt and dust.
Front Wheel Well

For the additional cabling I used Braided Wire 0.3mm from modellingtools and Aluminum Tubes from Albion Alloys. For the red pipe I used lead wire from plus model. For weathering I applied different types of washes - some using pin point technique and others more as a general wash. When that was dry I used mig streaking brushers to simulate dirt. Lastly I applied protective later of semi-gloss clear coat (H102), glued all the parts together and attached to the bottom of the fuselage.
Flaps Housings

For the flaps I used same base color as for the cockpit, which is Interior Green. Then I applied same technique of creating highlights and shading as in previous components. After applying gloss clear coat I commenced with washes (Dark Green and Grease Shafts and Bearings). Next I glued the top part and painted it. Lastly I applied black wash on it and coated it with semi-gloss clear. Last step was to attach flaps housings onto the fuselage part - here again I used Tamiya Epoxy Cement.
Putting it All Together

Now having all the assemblies ready it was time to put it all together. Due to to careful preparation before it went pretty much seamlessly. Firstly I mounted front wheel well, then nose gun bay followed - it sits really nice though there are some areas which will need a bit of work, but nothing drastic and will be done later on. Then cockpit was inserted just behind the gun bay and all 4 flaps housing were glued to the fuselage. Next top part of the fuselage was added and this brought everything together. Then I prepared bottom parts of the wings by painting landing lights housings and adding clear parts on top and lastly I assembled ailerons and added them at the trailing edge of the wings.
Next step will be the booms. Till then!


Comments